FINISHES
Embossed and debossed boxes
Embossing raises a design above the surface of a folding carton by pressing the board between a metal die and a counter-die. Debossing presses the same design below the surface using the reverse setup. Both are applied after printing, without ink, and both are standard on supplement, beauty and spirits boxes.

The mark
A change of level
No ink and no layer are added. A blind emboss reads on an unprinted panel.
Sequence
After the sheet is dry
Its own pass on a platen, once printing and cure are finished.
Direction
Up or down, one tool
Raised outside is recessed inside. Pressed in outside bulges inside.
Best at
Crests, monograms, rules
The die is cut to a path. Fine serif type is the usual problem.
What the die actually does
A cross-section through the board, in four steps. Nothing is added at any point: the mark is a change of level rather than a layer, which is why a blind emboss reads on an unprinted panel.
A cross-section showing how an embossed carton is made, in 4 steps.
- Printed board. A printed sheet, flat, dry and cured. Embossing is a converting operation, so it happens here rather than on press.
- Die and counter-die. A matched male and female pair, cut from the same file the plates were made from. A registered emboss needs both halves so the relief lands exactly on the printed mark.
- Under pressure. The board is squeezed between the two halves. Fiber is displaced rather than removed, so the panel keeps its strength and the shoulder keeps its shape for the length of the run.
- What it leaves. A shoulder on the face and a recess on the inner face. Debossing is the same operation with the two halves reversed, which is why the reverse of a debossed panel carries a bulge.
01Printed board
Board
Printed image
Cross-section, magnified. Not to scaleHover a layer to name it
01/04Step through it
Embossing and debossing specification
What the die is, what has to sit under it, and what it will run alongside. The rest of the finish library is set out the same way.
The tool and the pass
- Die types
- Single level, multi level and sculpted. A multi level die carries more than one depth in one hit. A crest cut this way has dimension, not just an outline.
- Tooling
- A matched male and female pair. A registered emboss needs the counter-die so the raised area lands exactly where the print is; a blind emboss on heavier board can be run without one.
- Applied
- After printing, as its own pass on a platen. It is a converting operation, not a print effect.
- Ink
- None. The mark is a change of level in the board. A blind emboss reads on an unprinted panel with no ink anywhere near it.
The board, and what it runs alongside
- Reverse face
- An embossed panel shows a recess on the inner face and a debossed panel shows a bulge. Plan for it on a carton with a printed inside face.
- Board
- SBS, FBB, kraft and recycled. The board is chosen for the pack and the relief is set to suit it.
- Combines with
- Hot foil in a single hit as a combination die, soft touch lamination, and matte lamination. See combining a foil die and a raised die in one hit.
- Also called
- Blind emboss, registered emboss, micro deboss, sculpted emboss.
The die is cut from your file. Fine serif type, hairline rules and elements close to a crease are what most often come back from a check with a change requested.
Send the file before the die is cut
We check the smallest elements in your design against what a die will hold on your board, and say which ones have to grow before tooling is made.
Emboss vs deboss: which one to use
The two operations use the same tooling and the same press pass. The difference is which way the board moves.
| Compared on | Embossing | Debossing |
|---|---|---|
| Direction | Raised above the surface | Pressed below the surface |
| Reverse face | Shows a recess | Shows a bulge |
| Best on | Logos, seals and texture fields | Text, fine detail and subtle branding |
| Board weight | Heavier board carries depth better, because there is more fiber to move | Works on lighter board, since the fiber is compressed rather than stretched |
| With foil | Combination stamping is standard | Less common, and the foil edge is harder to keep clean |
| Tooling | Die plus counter-die | Die plus counter-die |
| Reads best under | Raking light on a shelf, where the shoulder throws a shadow | Flat light, where the recess holds a line of its own |
Both run at the same cost and difficulty. A tactile mark on a pale board is usually embossed. A mark on a photographic panel is usually debossed.
How embossing runs here
It runs after the sheet is dry
Embossing is a converting operation and it happens after printing and after cure. The Komori cures with UV and IR at the delivery, so sheets leave the press dry and go to the finishing pass the same shift instead of standing in racks.
The die comes off the same file as the plates
It is cut at the same stage as the cutting forme, so the relief and the print come from one file. Where the emboss has to land on a printed mark, a counter-die is cut to match it. Where the mark stands alone on an unprinted panel, a blind emboss on heavier board runs without one.
Three settings at make ready
Pressure, dwell and the fit between the two halves of the tool are what produce a clean shoulder. All three are set once at make ready and then repeat for the length of the run.
Creases are pre-broken before folding
Every crease on the Bobst Novafold is pre-broken before the blank folds, so the board bends where it was scored instead of cracking through a raised area near a panel edge.
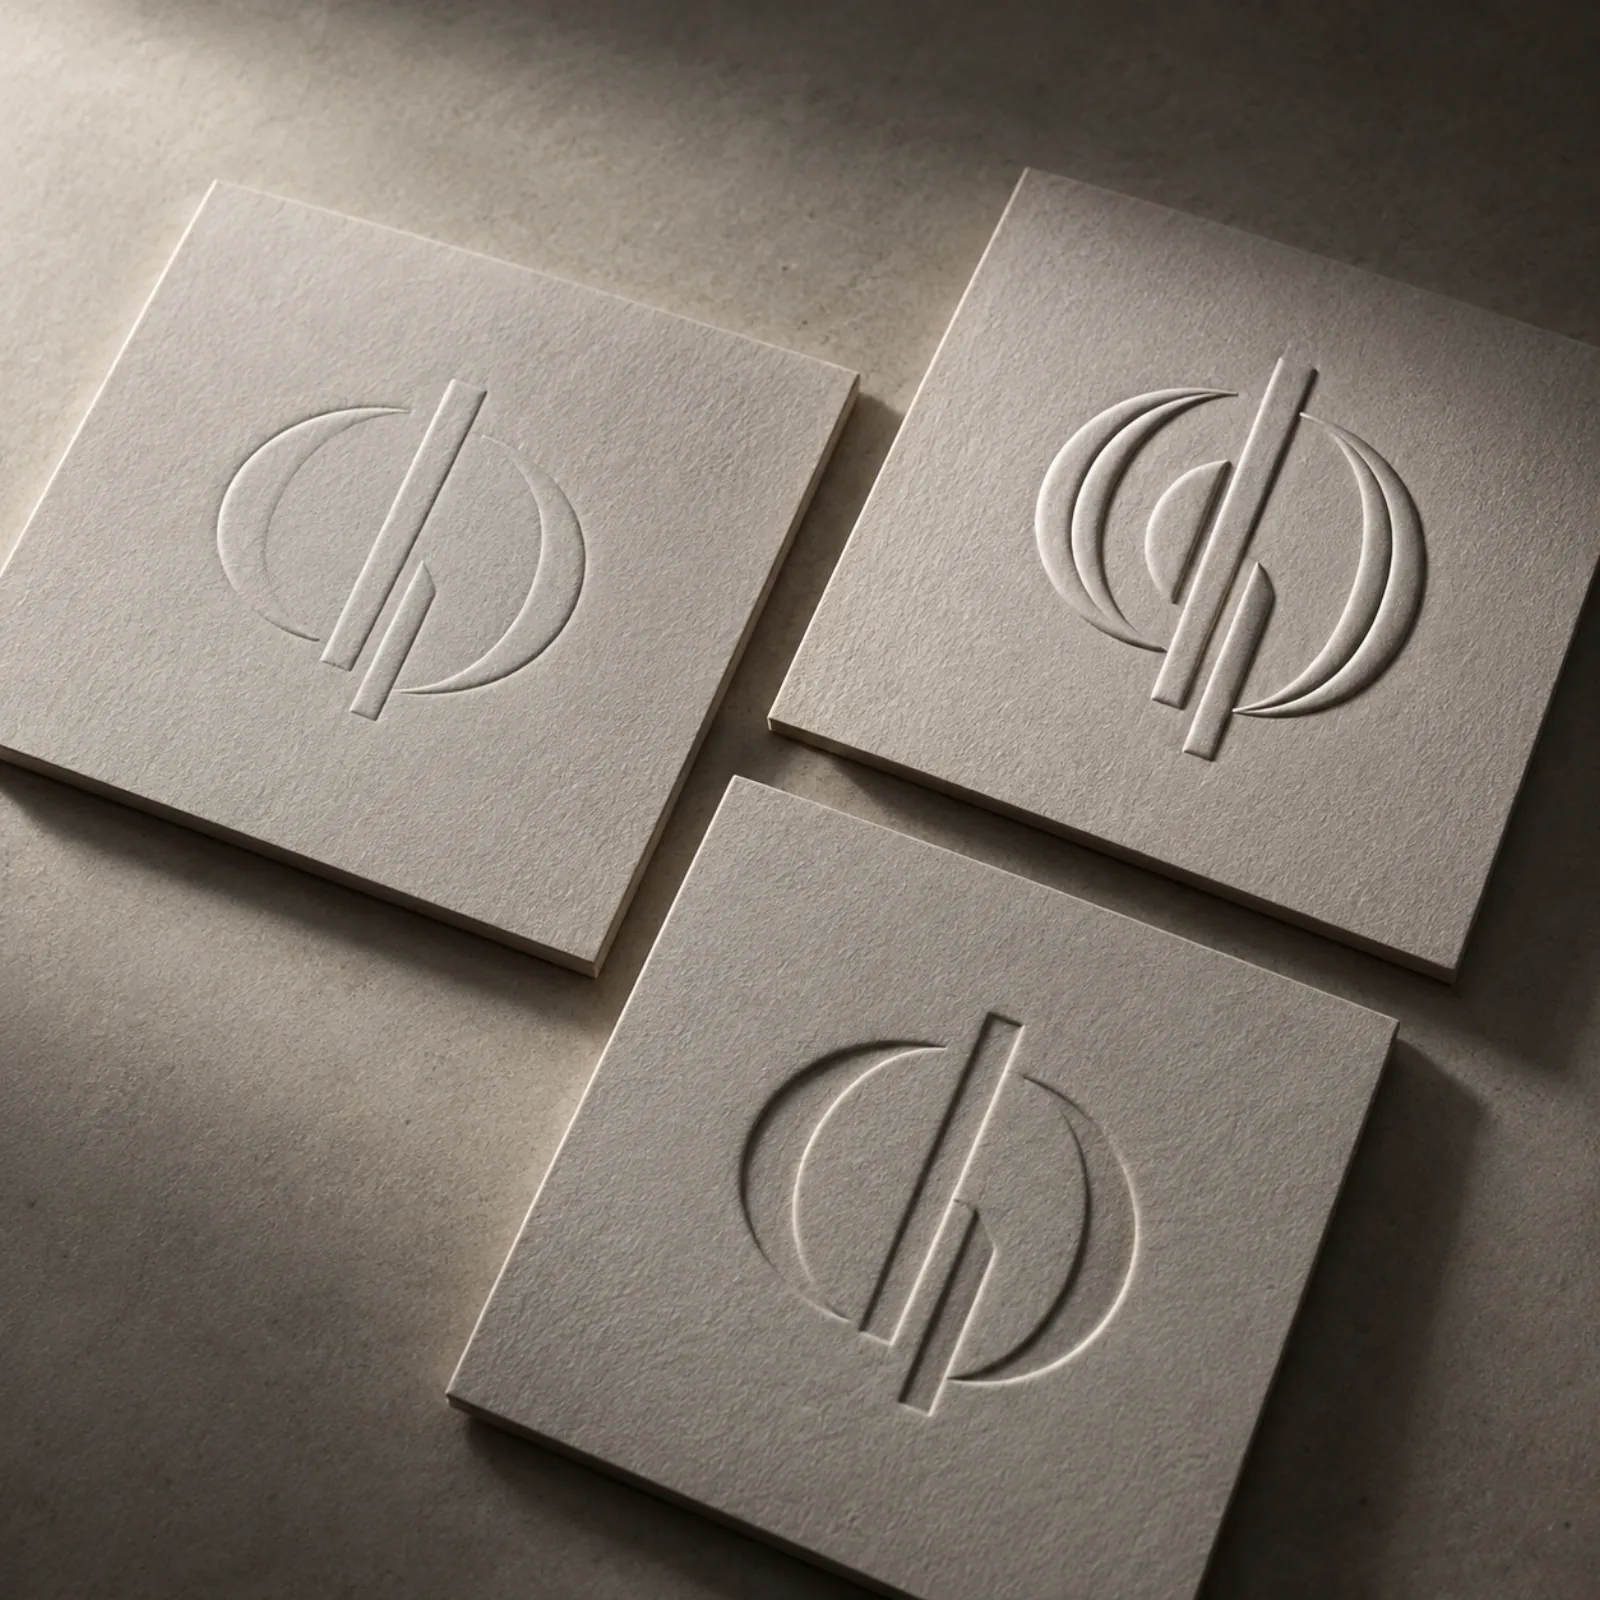
Three depths on one board
Three panels on one board, so nothing else is changing: a single level emboss, the same mark cut as a multi level die, and a debossed panel beside them both.
Cost logic
Tooling is a one time cost carried across the run. A multi level die changes the tooling and not the running cost.
Once the die exists, a sculpted crest and a flat outline run at the same cost.
What it costs against a US supplier
Landed cost runs 20 to 30 percent below a comparable US supplier quote. That is one price: board, printing, finishing, tooling, import duty, shipping and delivery to your door, with nothing added later.
Get a quoteWhen to emboss, when not to
Use it when
The brand needs to be recognized by hand.
Relief can be felt without being seen. On a supplement carton picked up from a shelf, a raised mark is felt before the panel is read.
The carton sits beside flat printed competitors.
Flat matte laminated boxes on a shelf reflect light evenly. A raised shoulder catches it, and that shows from further away than a color change.
Foil and relief are both wanted.
A combination die puts the foil on the raised area in one hit, with no second pass to register.
Do not use it when
The element sits close to a score or a glue flap.
A raised area near a crease weakens the fold, and one over a glue flap interferes with the seam on the folder gluer. Both are fixed by moving the element, not by reducing the depth.
The detail is finer than a die will hold.
Hairline rules and small serifs fill in or break up, and the result reads as a printing fault.
The inside face is printed and visible.
A recess shows through on the inner panel of an embossed carton. It is visible on an open display pack or a carton with a printed liner.
Where the relief goes, by category and structure
Relief suits packs that are picked up and handled. The last column is where it usually goes.
The crease pattern decides where a raised area can go, so the finish is specified against the structure. All of them are described under every carton structure we build.

| Category | Structure it usually sits on | Where the relief goes |
|---|---|---|
| Supplements | Straight tuck end and tuck boxes | The front panel mark, kept clear of the tuck crease |
| Beauty and skincare | Straight tuck end, sleeve | A blind emboss, often as raised detail under a soft touch film |
| Fragrance and spirits | Tray and sleeve, hinge lid | Combination foil and emboss on the face, crest only |
| Confectionery | Tray and sleeve, four corner | A texture field across the lid rather than a single mark |
| Tea and coffee | Seal end, auto lock bottom | A debossed wordmark, which survives a photographic panel |
Questions about embossing and debossing
Embossing pushes the design up out of the board and debossing presses it down into it. The tooling is the same matched die pair in both cases and the press pass is the same; what changes is which half of the tool the board is driven into. The difference shows on the reverse: an embossed panel carries a recess on its inner face and a debossed panel carries a bulge.
Neither is better as a rule. It depends on the mark and the board. Embossing suits logos, seals and texture fields on heavier board, because there is enough fiber to move and the raised shoulder throws a shadow on a shelf. Debossing suits text, fine detail and lighter board, because compressing fiber is gentler than stretching it. If the inside face of the carton is printed and visible, debossing is usually wrong and embossing is usually right, since a bulge reads worse than a recess.
Yes. A combination die carries the foil and the relief in one tool, so the foil lands exactly on the raised area in a single hit. It is cleaner and cheaper than two separate passes, which have to be registered to each other and can land a fraction off.
Heavier board carries depth better, because there is more fiber to move and the shoulder holds its shape once the die lifts. SBS, FBB, kraft and recycled all take relief and each behaves a little differently: coated boards give the cleanest edge, uncoated and kraft give the most tactile one. The board is chosen for the pack first and the depth is set to suit it. Debossing is the more forgiving of the two on lighter stock, since the fiber is compressed rather than stretched.
Vector artwork for the elements to be embossed, on a layer of its own, since the die is cut to a path, and a path traced from a JPEG carries its compression artifacts. Where a mark has more than one depth, say which element sits at which level, because a multi level die cannot be inferred from a flat drawing. Tell us whether the emboss is blind or registered to print, and check the element against the dieline rather than the panel: a mark that looks centered on a face can still be sitting on the crease that face folds along. The working file is more use to us than a flattened PDF.
Not on the panel, where the board is displaced rather than removed. It does weaken a fold, so the distance between a raised element and the nearest crease is checked before tooling is cut. The other place to watch is the glue flap: a raised area under a seam interferes with the bond on the folder gluer, and the fix is to move the element rather than to press it more lightly.
Last reviewed
Send the mark for a check before tooling
Swatches go out with a single level emboss, a multi level emboss and a debossed panel on one board. Send artwork alongside the request and the check on your own smallest elements comes back with them.